Livestream Operation
TL:DR;
Use Stream Deck to control Scenes in OBS! Do NOT use the Scenes panel in OBS directly!
Do not connect laptop to WiFi. Doing so will break the network audio and will generally require a system reboot to fix.
Startup
-
Turn on cabinet power.
Flip the switch located at the top right corner.
Note: I suggest not turning the amplifier on yet. Standard operating practice for live sound engineers is that the amplifiers should be turned on last (and turned off first!). This is not imperative but is recommended. -
Plug Pastor's phone into router and toggle Ethernet tethering ON for internet access.
Or any phone with a sufficient data plan for tethering.
-
To keep things simple, ensure both the Ethernet adapter and Stream Deck are unplugged BEFORE the next step.
Laptop will not boot if Stream Deck is plugged in.
-
Turn laptop on.
-
Turn on tablet for microphone control in auditorium.
press and hold power button for several seconds until display turns on and it begins booting.
Swipe up when the lock screen displays to unlock tablet. No password or pin is needed.
Ensure tablet is connected to BBCMT wireless network.
-
When the laptop is fully booted to the desktop, plug in the Ethernet adapter and Stream Deck.
- Open Universal Control app on tablet.
Look for the following icon.
- Turn Amplifier On
-
Double-click the shortcut on the desktop labeled bbcmt_livestream.sh.
This will open all software needed.
- OBS Studio
- Web browser
- Reaper
- qpwgraph
- Radio
-
Load Pastor's notes from Onedrive.
A tab in the web browser should have automatically opened to the appropriate webpage. Click 'search' to display recently accessed documents to find the sermons Pastor will have been considering for his message. Double check with him for the correct message. -
Edit the livestream title to match sermon title from Pastor's notes.
Firefox should have loaded a tab to the Youtube control panel.
- Set PTZ camera presets as appropriate.
Press Stream Deck's Up and Down buttons to find the PTZ controls.
Long press the Preset buttons (labeled with a number eg. 1, 2, 3) for 1 second to set current angle to that preset.
The button will turn Red to acknowledge that a preset is being set.
If held longer than 4 seconds, button returns to black coloration to indicate that preset was NOT set. - Load bible references into OBS Studio bible plugin.
Reference Pastor's notes.

Operation
TheFor operating the livestream, the Stream Deck should look similar to this after it is pluggedyour in.
best friend!
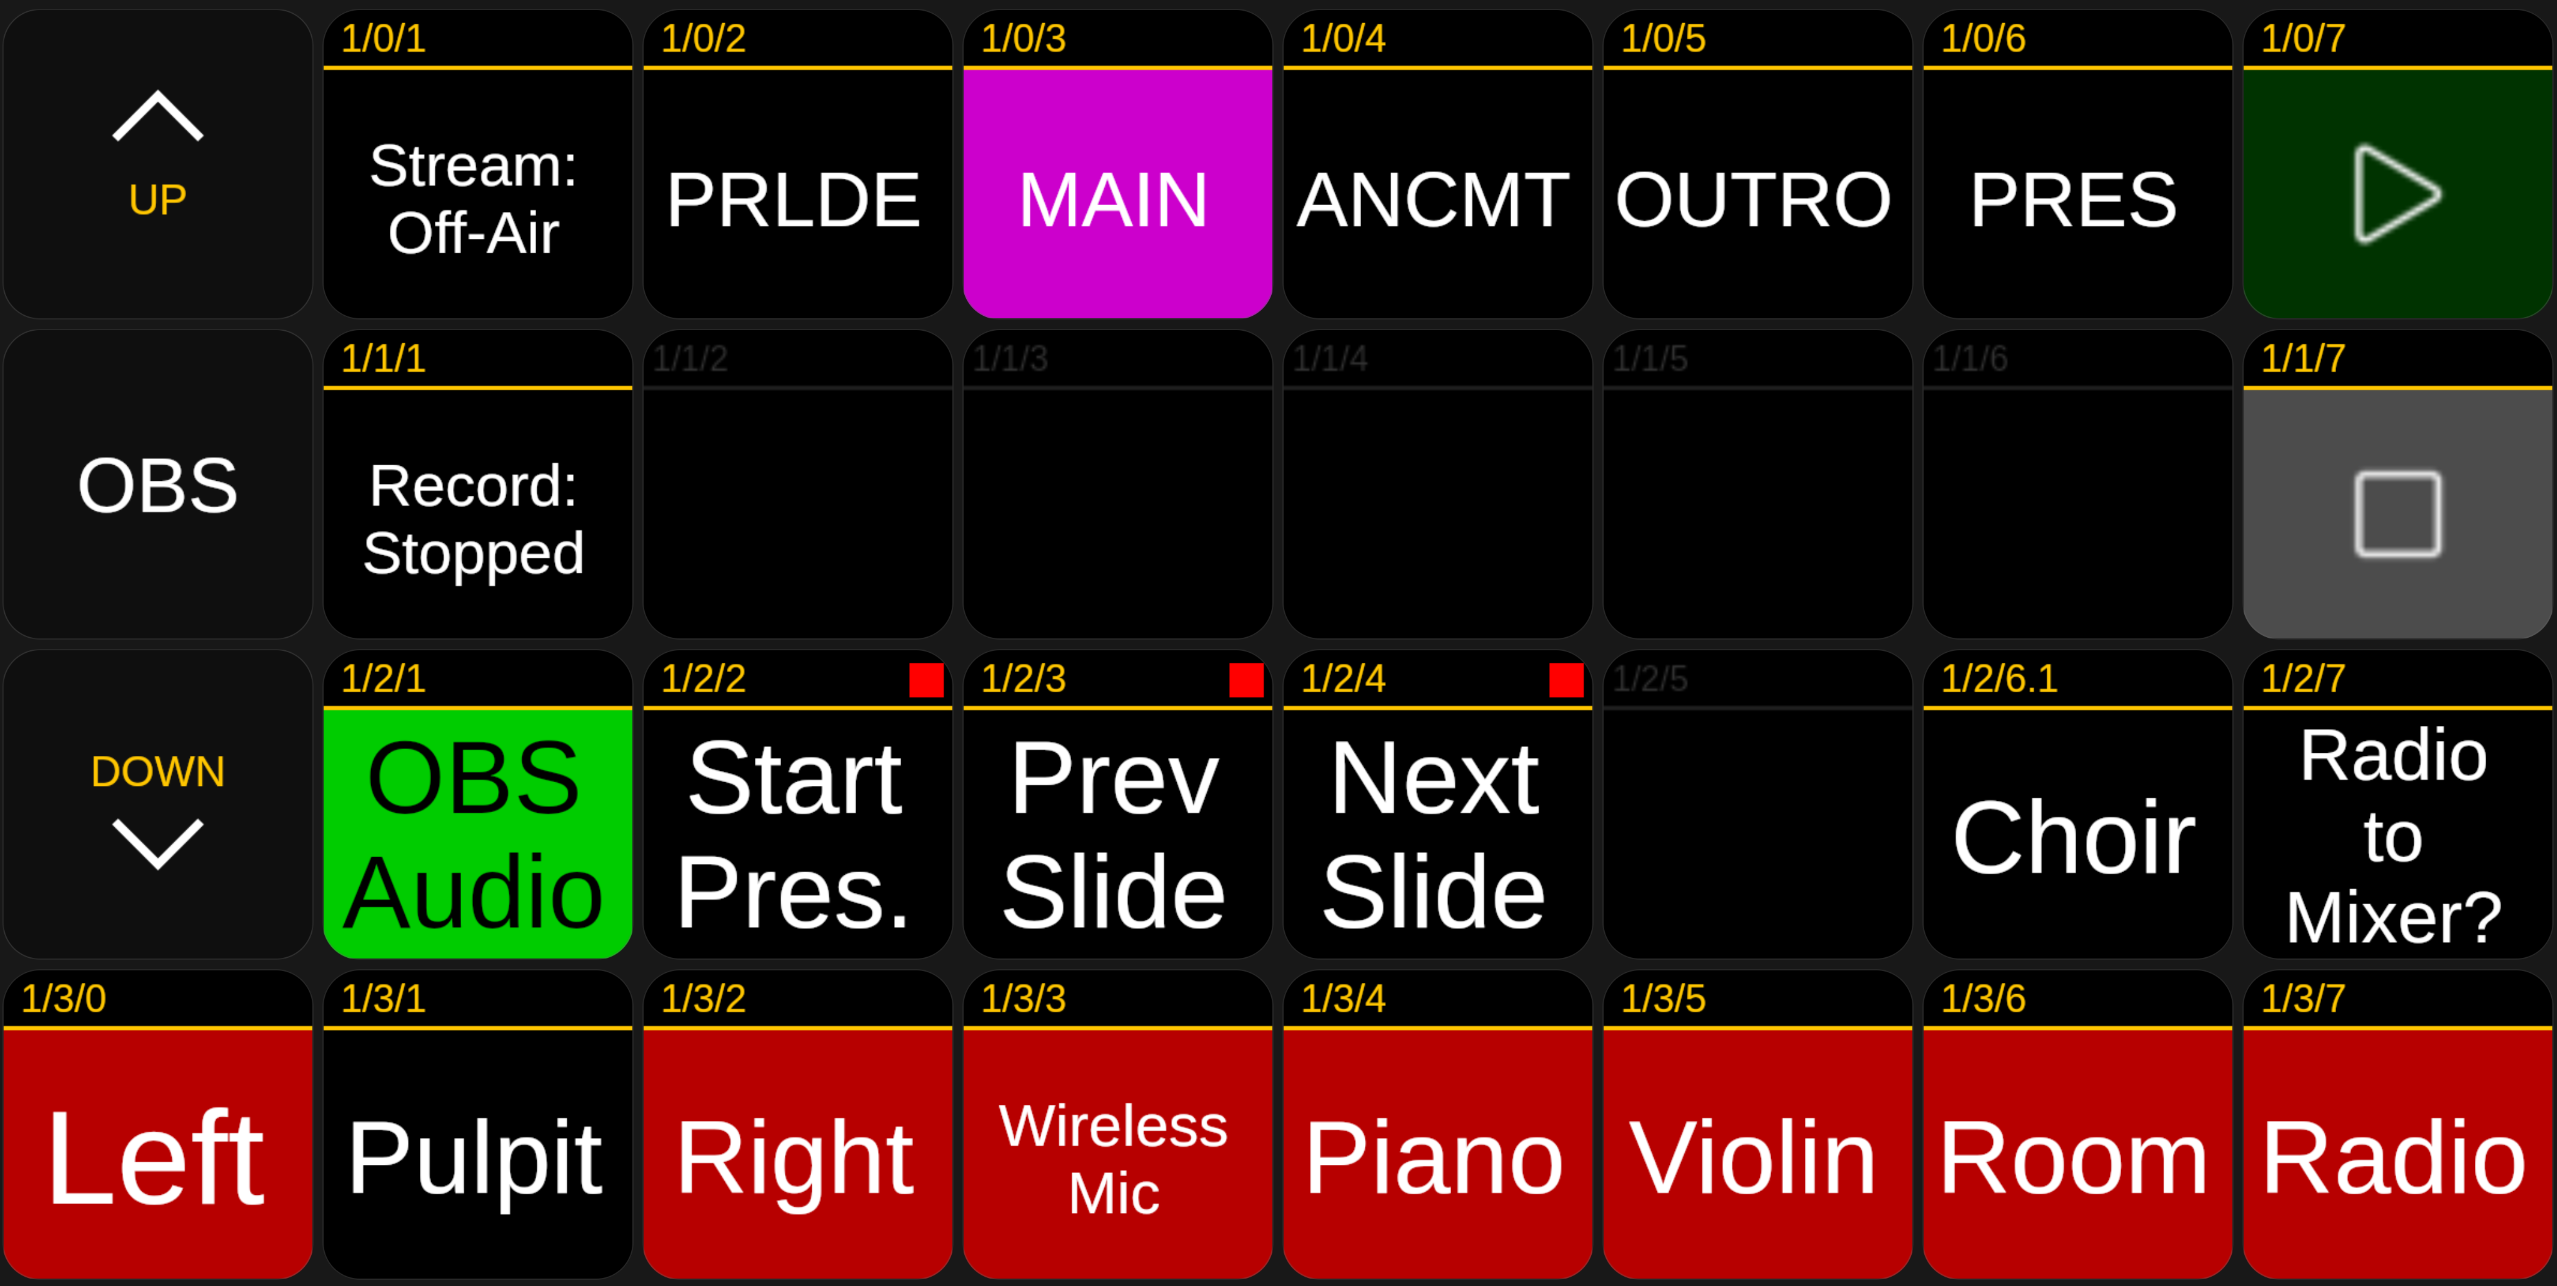
If there is ANYTHING you learn from this document, let it be the following...
Use the Stream Deck buttons along the top row labeled PRLDE, MAIN, ANCMT, and OUTRO to control which OBS scene is broadcasting.
Do not use the Scenes panel in OBS!
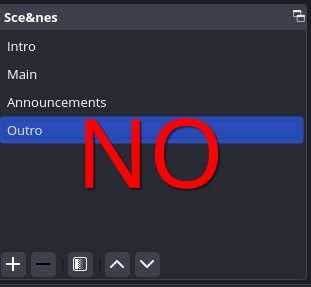
Again, use the Stream Deck!
The reason why is that the Stream Deck is responsible for muting and unmuting the appropriate microphone channels for each scene.
It is vitally important that we use these buttons to change scenes and NOT within OBS.
The background color of the button will change to indicate which scene is active.
PRLDE is when the livestream is started before the service begins. Mutes everything except for the Radio (waiting background music).
MAIN is the primary scene to use during hymns, sermons, etc. Unmutes the Pulpit mic and mutes the Radio.
ANCMT is used during announcements as Pastor does not want to broadcast any personal information he may be sharing with the church during that time. Mutes everything AND unmutes the Radio.
OUTRO is to use at the VERY end after the sermon and last hymn (if there is one) to close the livestream. Mutes everything.
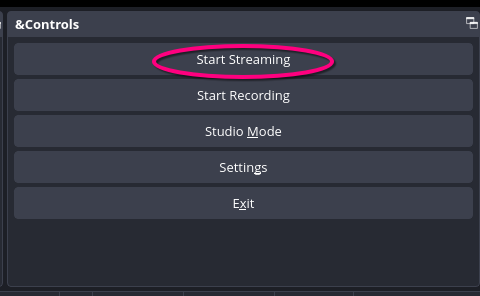
The stream can be started one of two ways.
- by pressing the button labeled 'Stream' on the Stream Deck.
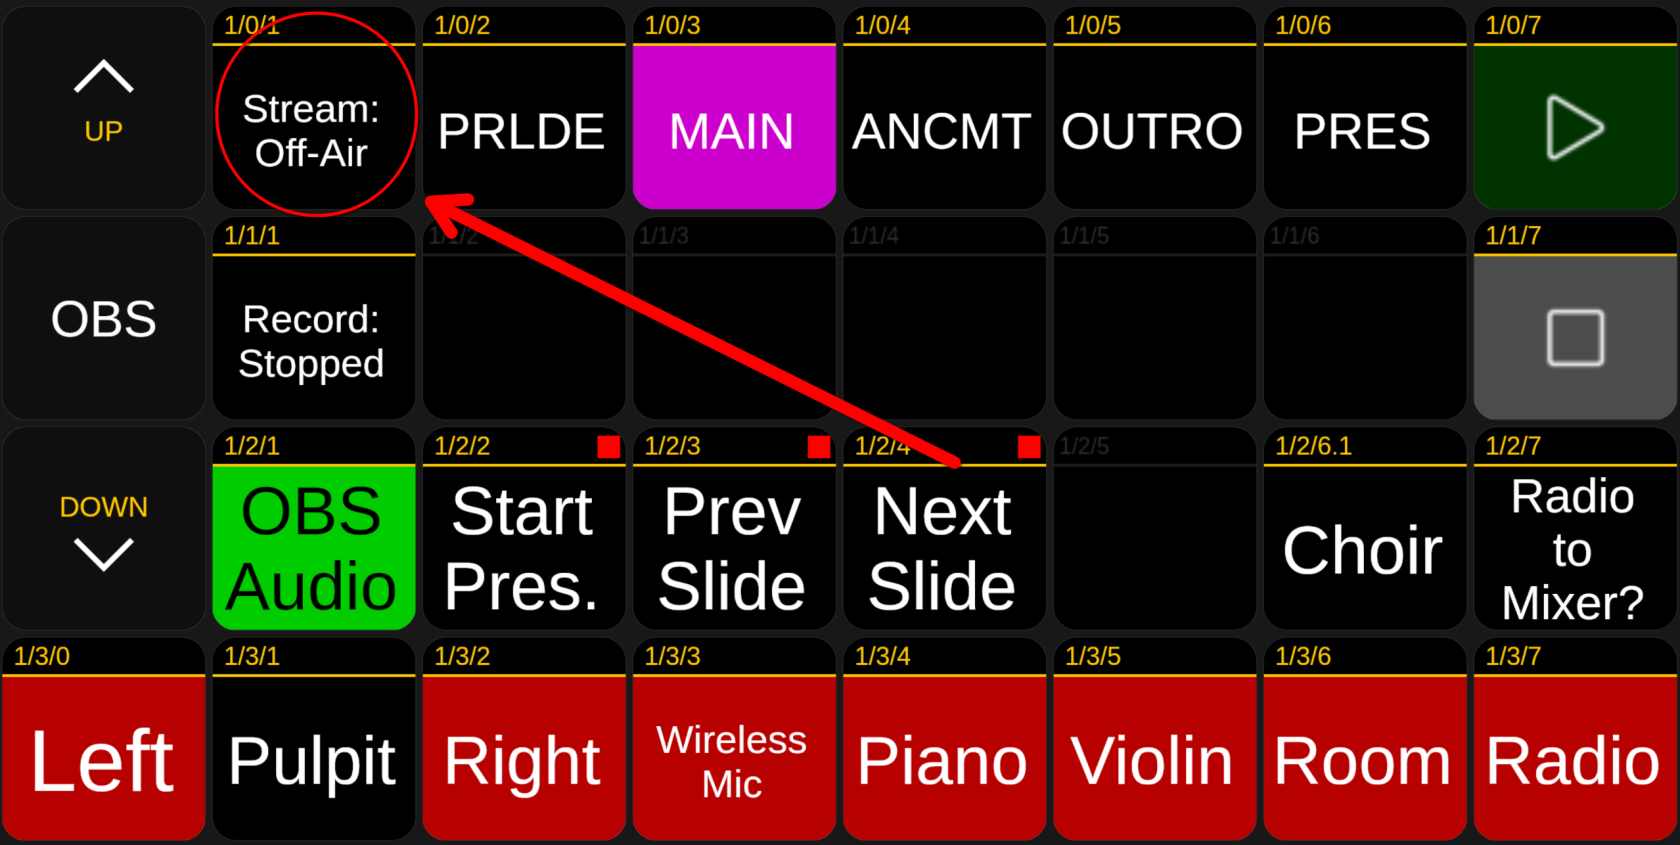
- Or you can click the stream button in OBS if you wish.


For additional control over muting ofspecific microphones during service, notice the bottom row of buttons labeled Radio, Left, Pulpit, Right, Wireless Mic, Piano, Violin, and Room.

These control the muting and unmuting of microphones for the livestream. Buttons with a RED background are muted and are not heard on the livestream. Press the relevantdesired button to change the mute status.
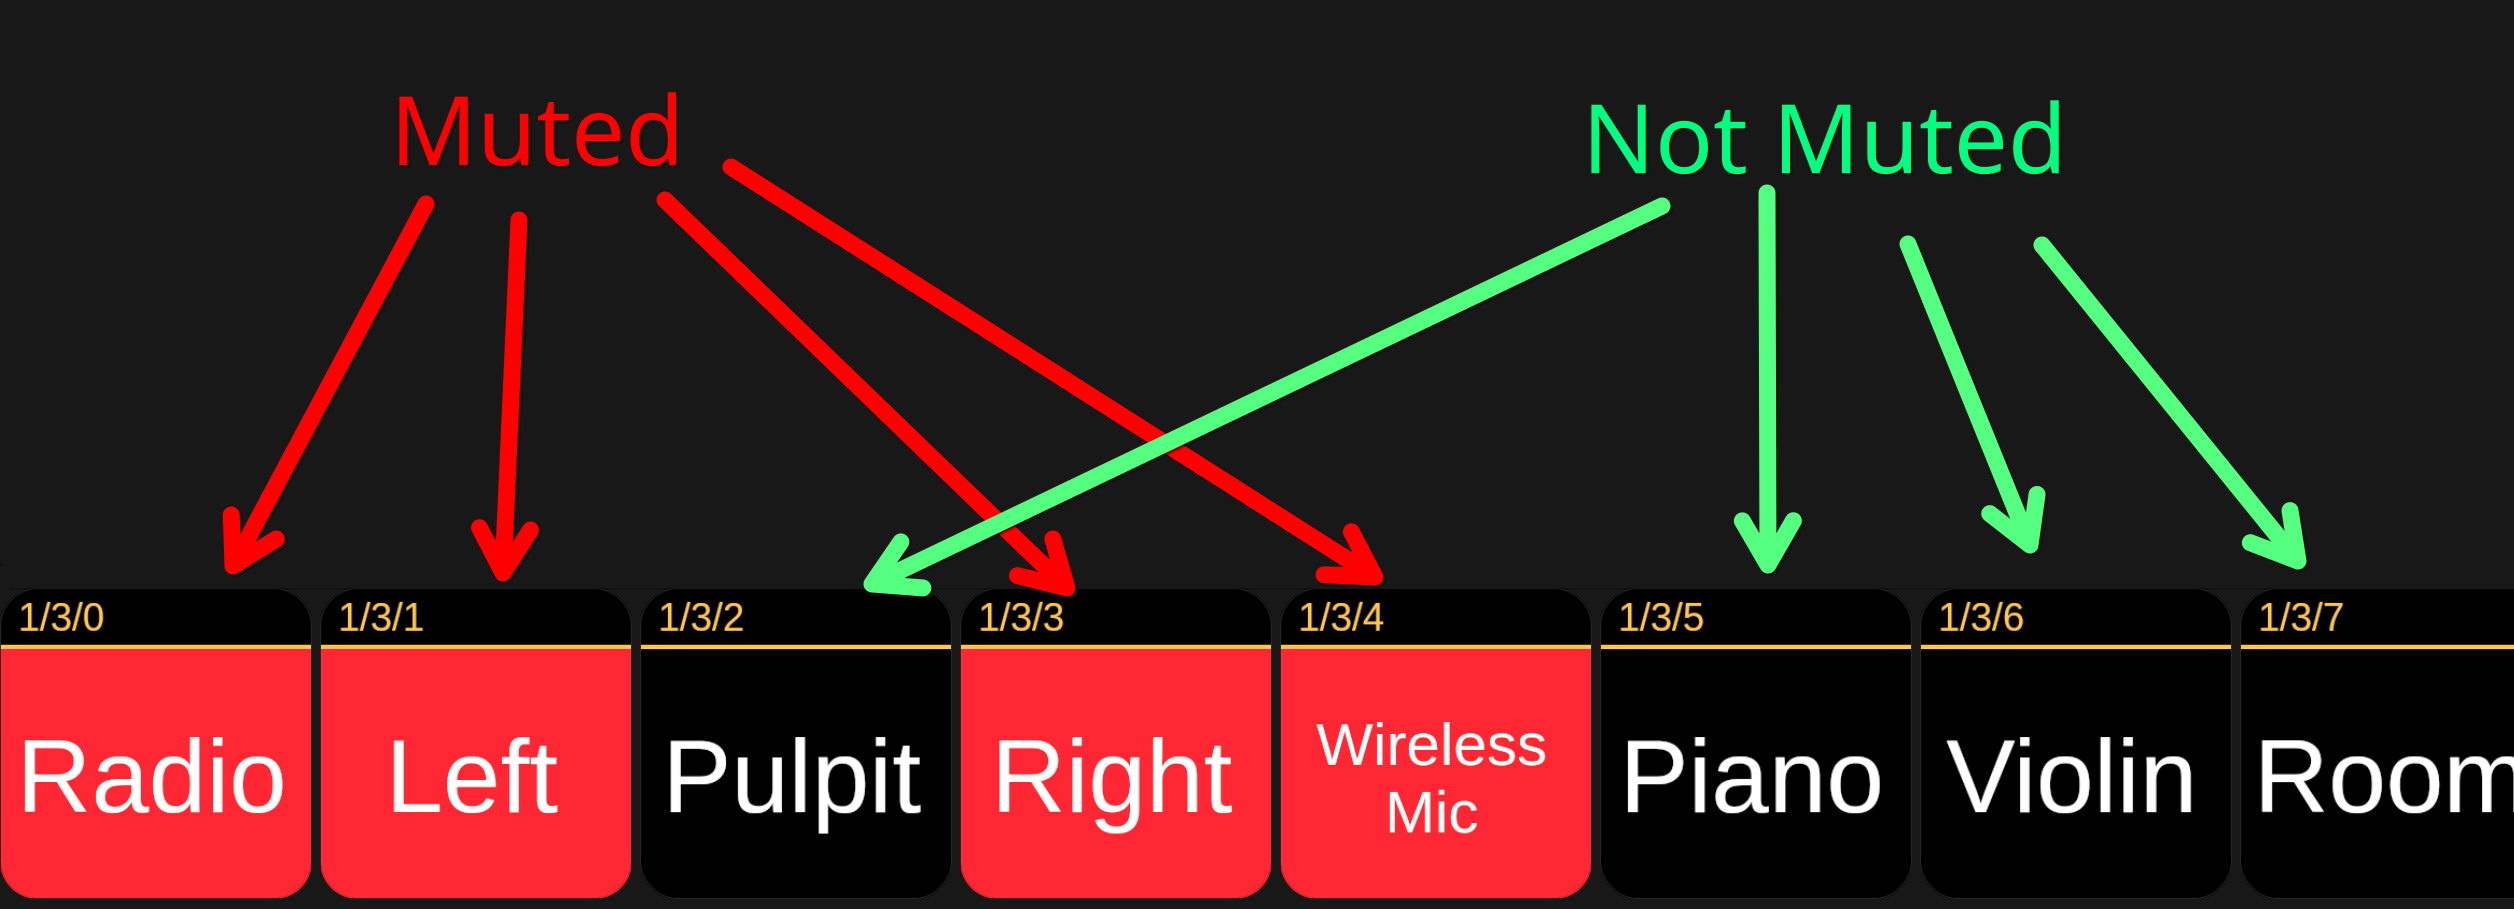
- Radio refers to the background music used on the livestream while waiting (during the PRLDE and ANCMT scenes).
- Left is the microphone on the left side of the pulpit (our left while sitting at the table).
- Pulpit is the center mic on the pulpit.
- Right is the mic to the right side of the pulpit.
-
Wireless Mic is the lavalier microphone used by the preacher.
This channel uses a de-reverb plugin to ensure sermon is clear and easy to understand. Highly preferred for the preaching.
Do not use while Pulpit mic is unmuted! There will be serious audibility issues due to latency between the two mics. - Piano is self-explanatory.
- Violin is the mic aimed at the violin
-
Room is the microphone located on the video camera. This should be unmuted while the congregation is singing hymns and muted at all other times.
Try to make sure that Room is muted while anyone is talking at the pulpit. It will pick up a lot of reverb and make it hard to understand to what is said if left unmuted.
Navigation
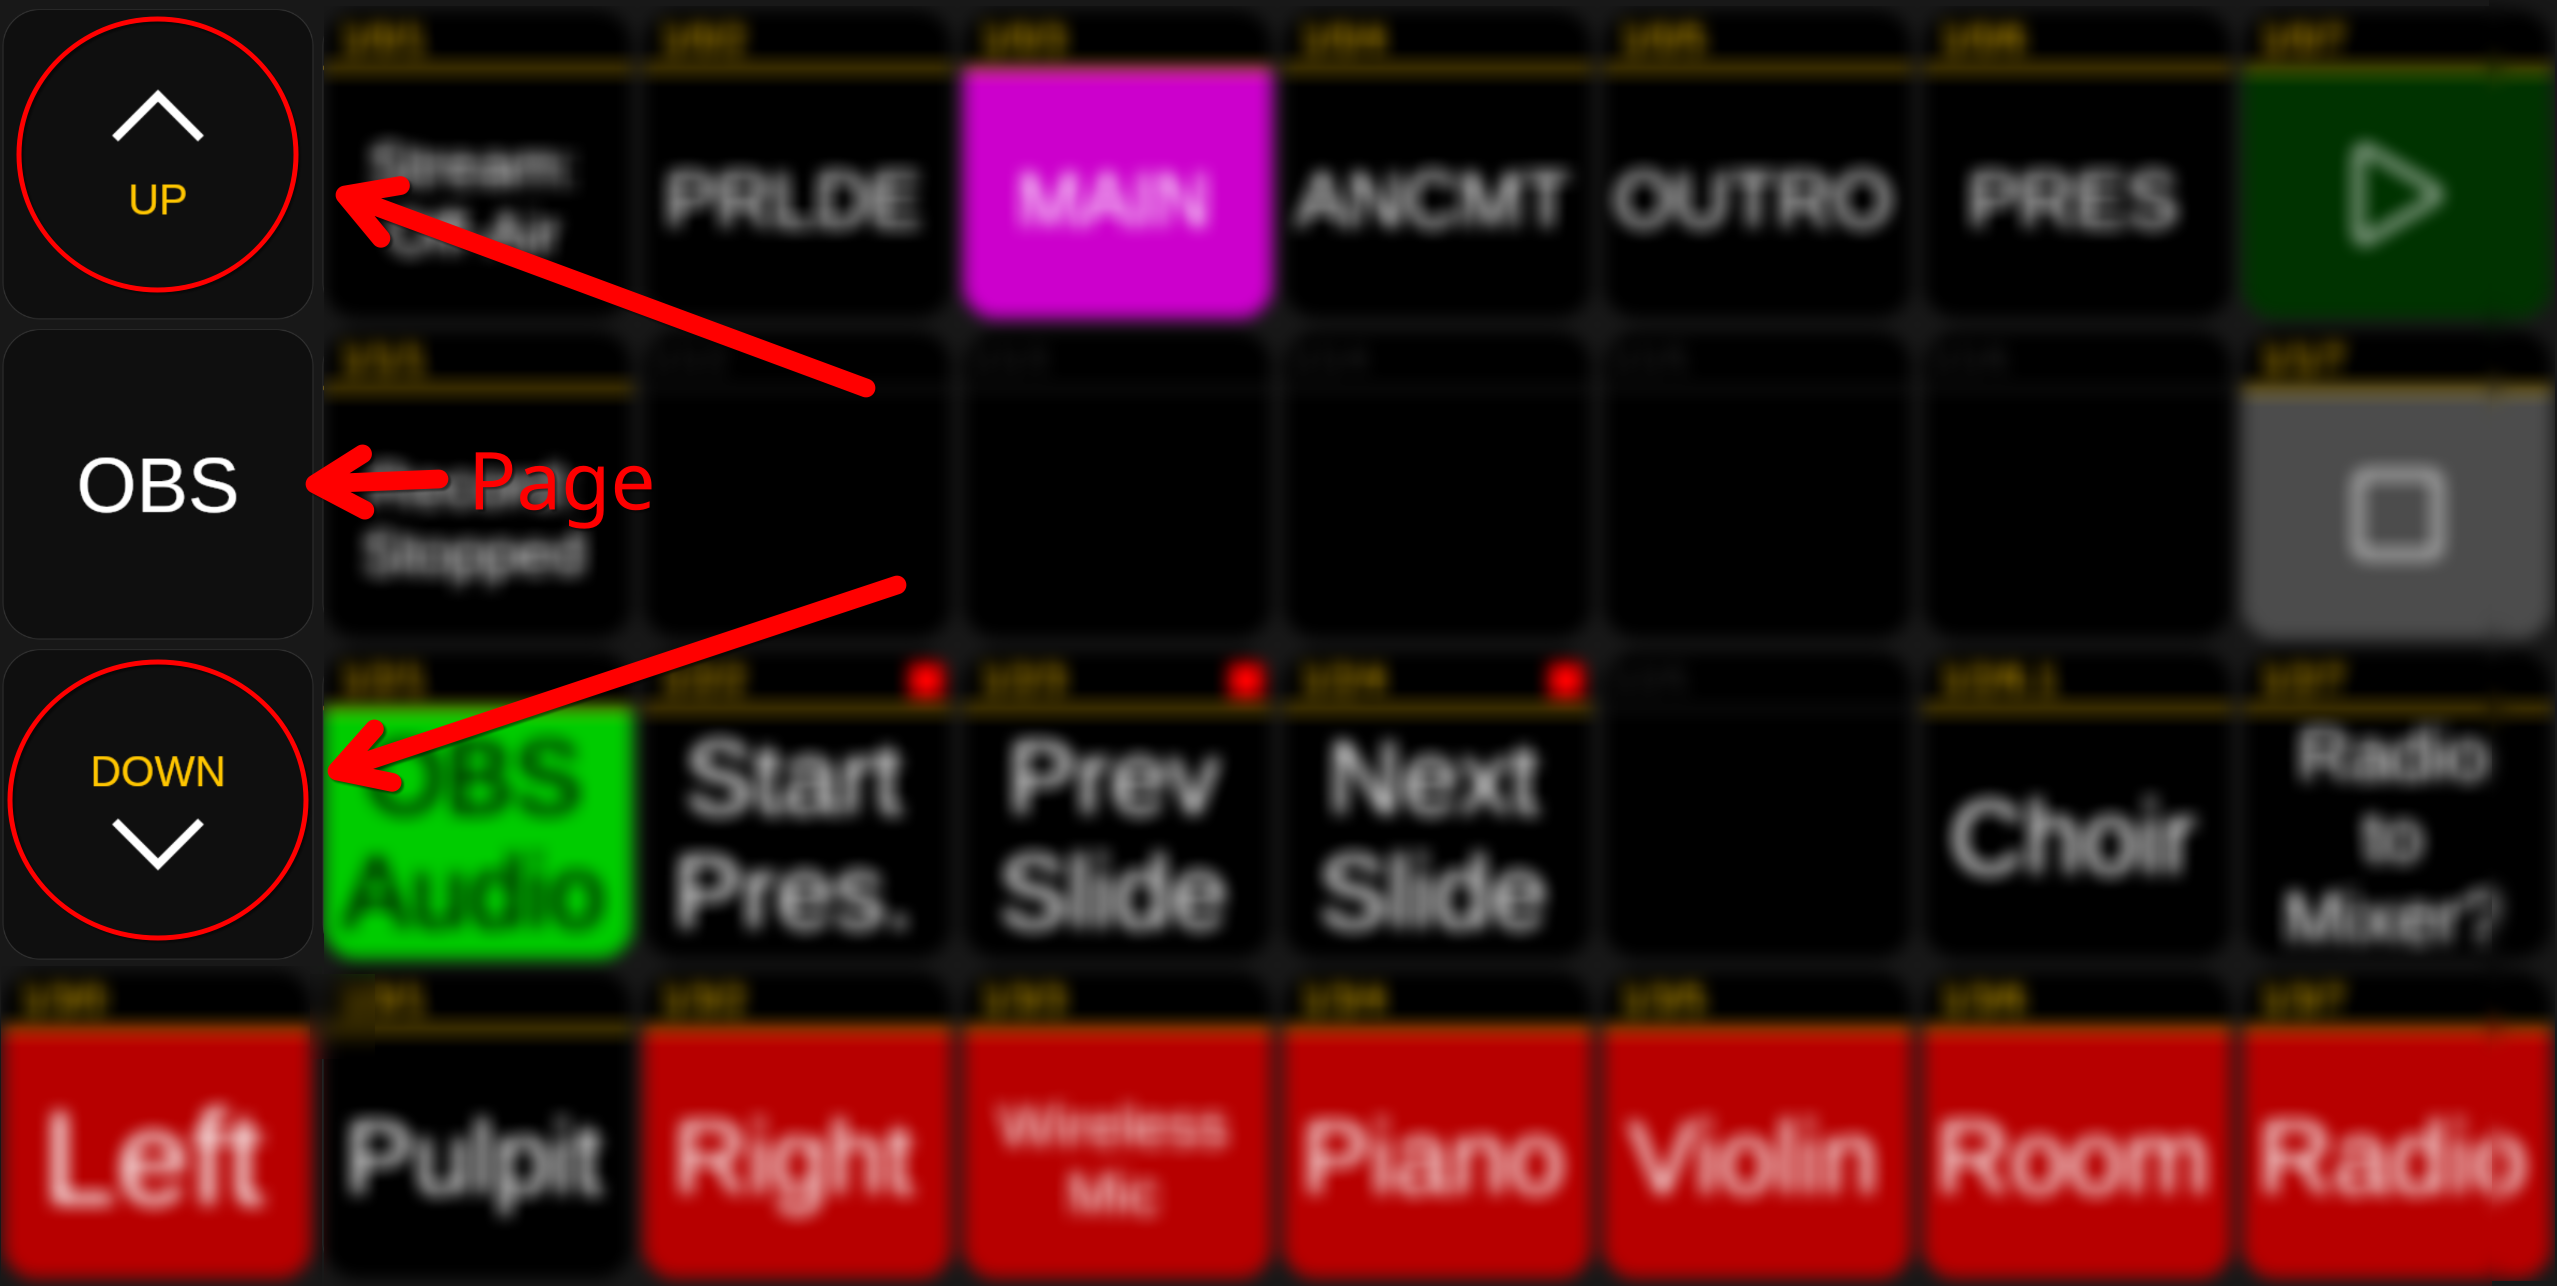
UP and DOWN buttons navigate through the different available pages.
Currently we have two pages, OBS and PTZ. Each is titled for their respective purpose.
OBS is set as the primary layout while operating the livestream. It will contain the audio mute buttons, scene buttons, and ptz presets.
PTZ is used for manipulating the PTZ camera and configuring the presets.
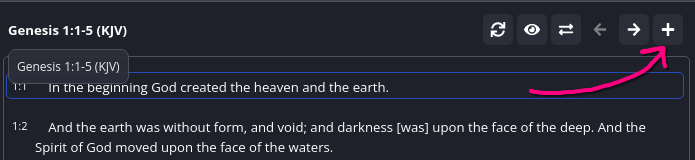
OBS Bible Plugin
This dock should be visible along the right side of the OBS Studio window.
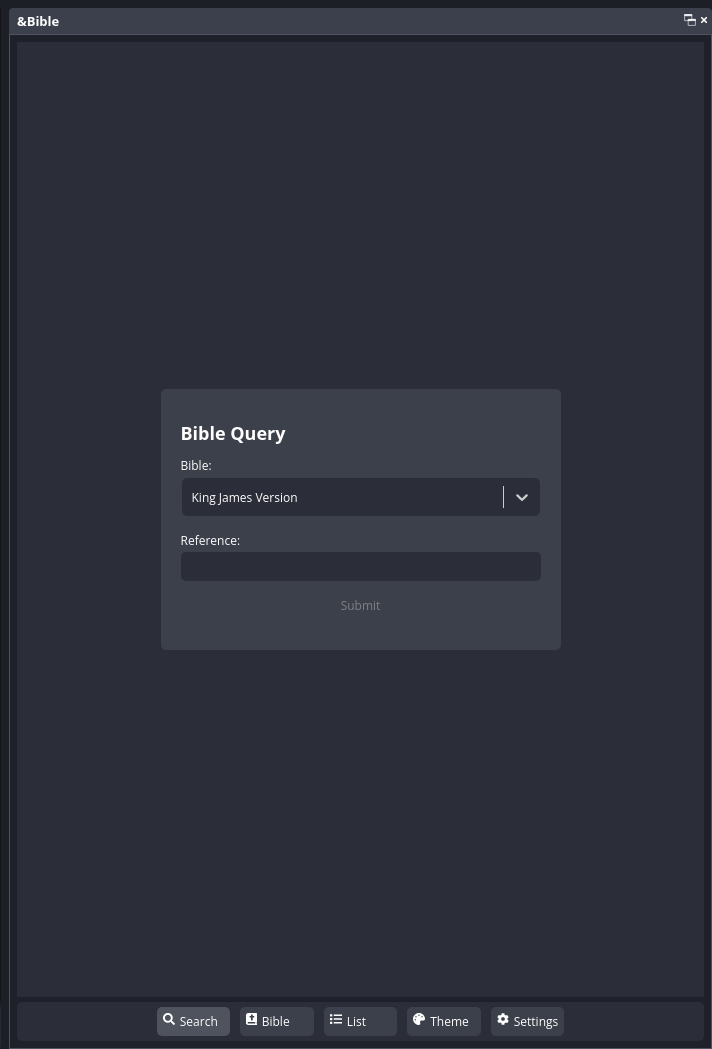
First, click the List button to open the list of saved references.

We need to clear the prior week's references. At the top right corner of the dock, there should be a X button used to clear the list.

BEWARE do NOT click the ‘other’ X's.
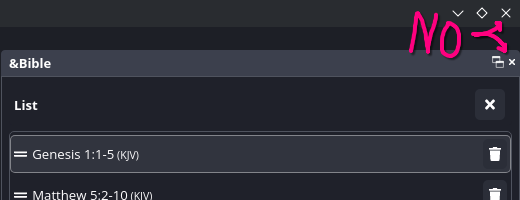
After clicking the proper X, there will be a popup at the bottom asking for confirmation.
Click on Remove before time runs out to clear the list.

Return to the Search panel by clicking that button along the bottom of the panel.

Use the typically Bold verses in Pastor's notes and search for those passages using the Reference text box.
After finding the passage, use the + icon to add that passage to the saved reference list.
Or use Ctrl+Alt+A.
The passages you add will be shown in the List view making it easy to pull up the references Pastor chooses to use while preaching.
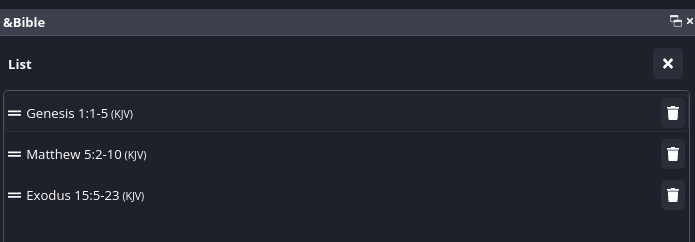
Click on the item to load that reference.

Click on the verse for it to be displayed on the livestream and it will be highlighted to reflect that.its visibility.
When the verse is highlighted, it will be displayed on the MAIN scene.
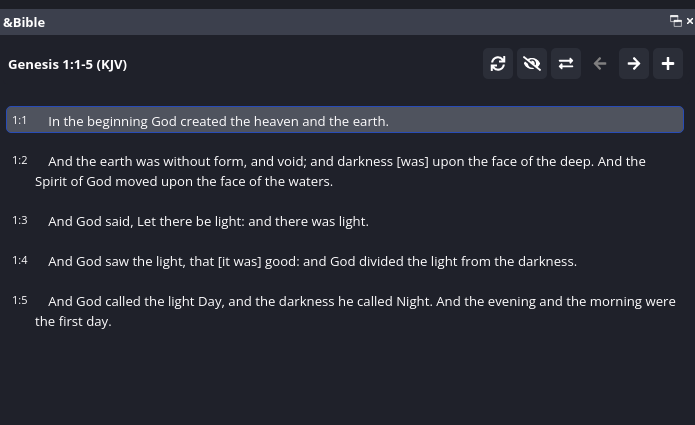
Click on each verse so the livestream viewers can see and follow along as Pastor (or anyone for that matter) is reading them aloud.
After the verse(s) have been read, click whichever verse is highlighted to deselect and hide the bible from the livestream.
Camera Angles
Generally we use 4 different frames.
- Centered on the pulpit and zoomed in close for the sermon.
- Centered on the pulpit and no zoom for congregational singing.
- Centered on the pulpit and slight zoom for choir.
- Centered on the piano/violin for offertory.
Conclusion
When livestream is concluded, feel free to close all software used (OBS Studio, Reaper, VLC, etc) ignoringclicking No on any prompts to 'save' unsaved projects (Reaper does this)
- and
Turnturn off the laptop.Eitherpackingopenup equipment, gently.Hopefully using the
'start'over-undermenucoilingintechnique for thebottomEthernetleft cornercables andclick Shutdown, then click shutdown to confirmOr press the power button, then click shutdown to confirm.
Begin
Turn off camera.Unplug allmic cablesto camera and laptopPack up Camera and place in computer bag.Unplug USB Power Hub and place in computer bag.Pack up any small cables into the computer bag.
Troubleshooting
| Laptop has no internet access? | Ensure a smartphone (with a USB-C connector) is plugged into the ethernet adapter on top of the cabinet, the adapter has its ethernet cable plugged into the WAN port on router and Ethernet Tethering is enabled in the smartphone's settings. |
| No sound from laptop headphones? | Open qpwgraph from system tray and connect output channels 1,2 from Reaper (right-side of box labeled Reaper) to headphone input channels (left-side of box labeled ______) |
| Laptop not receiving audio or the audio received is intermittent? |
double-click ‘reset_audio.sh’ shortcut on the desktop. A prompt for a password should appear once or twice. Not fixed? Reboot router by unplugging DC power connector on left side of router for 10 seconds, then plug back in. Not fixed? Reboot laptop. |
| Mixer not displayed in Universal Control app on tablet? | Ensure tablet is connected to wifi named “BBCMT”. |
| BBCMT wifi not found? | Ensure cabinet power is turned on and router power plugs are in place. |
| Clicked the wrong X while trying to clear the saved bible reference list and the panel disappeared? |
Click the OBS Studio menu labeled Docks. click item named Bible Plugin to reopen the bible control dock
|
